Hi! What are you looking for?

Welcome to my 3D junk fair! This is the place where you'll find all the stuff that I've modeled in 3D for the design of my house and garden - and I'm willing to share! Hooray!

Montag, 27. Mai 2013

Towel Rail

Ok, here we go. Let's start with something pretty simple: a towel rail for the bathroom

Towel rail

It's a chrome towel rail for two towels, 50cm long. It looks somewhat similar to a "Grohe Essentials".

Basically, this is simply a combination of cylinders. I thought about which parts the real thing might be made up and then built it that way in FreeCAD. Then, I used the fillet function on almost all edges with different radiuses. For this object, everything can be done in FreeCAD's "Part" view.
One small detail for a realistic appearance is, that the upper and lower bars are arranged with an angle. When arranging this using the "placement" in FreeCAD, it is important to set the rotation axis correctly aligned with the center of the holder part for the bar. I actually built the upper bar with it's holder first from two cylinders, merged and rounded. Then, I mirrored it for the lower bar. The wall mount is also made of two cylinders, plus an additional one for the cover (it's a separate part which slides against the wall to cover the screw heads, therefore it's not merged with the actual wall mount). When all the parts were ready, I rotated the bars and positioned everything so that it's correctly aligned.

To get the chrome appearance, I used a trick: after exporting the design from FreeCAD as a .obj file, I imported it to Sweet Home 3D, only to add it to a new "House" project and then export it from the 3D-view again to a .obj file. Sweet Home 3D then creates the .obj file, and a .mtl file containing the material definitions. Then I opened the .mtl file of another object, which had the surface I wanted, in a text editor (actually, the object was a mirror). Using the text editor, I copied the material definition from the mirror to the material file of my towel rail. Works perfectly!
Of course, there would have been other ways to create a suitable material. I've already experimented with Blender, but for me and for the task, it appeared too complicated.

Here's another picture of the towel rail "in action":
Towel rail in "my" bathroom

By the way: the images above are rendered using the picture function in Sweet Home 3D's 3D-view window.

If you'd like to use my towel rail for your project, you can download it here. I hope you like it, or maybe found some inspiration to make something similar yourself. Of course, my explanation of how I created it is not a step-by-step recipe, but with some help from the programs' websites or google, it shouldn't be too hard to try yourself.
Freitag, 24. Mai 2013

Hi!

I'm happy to welcome you to my 3D junk fair! This is my first post to this (any, in fact) blog, so let me explain in a few words, what this is all about:

Maybe you've been trying to plan the home of your dreams with one of these 3D-home-planners - I did! And while I did, I soon recognized, that the objects which came with the software or are available for download are nice, but not quite what I'll be actually using in my house. But I wanted to plan my house! So, I needed an alternative...

Well, you should know that the program of choice for my home planning is the fantastic Sweet Home 3D by eTeks (http://www.sweethome3d.com/). This software is very easy to use and packed with features, you wouldn't believe that it actually is free! It has much improved over the last couple of years (yes, I've spent quite some time planning my home...), so that I wouldn't only consider it a great tool for interior design, but with a little experience in using it also for gardens - or whatever one might imagine. There is some good furniture installed with the program and even more available for download via the product website. To get more, there is an import feature for e.g. wavefront .obj files into the furniture catalog - and this is where I saw  the chance to get my features in!

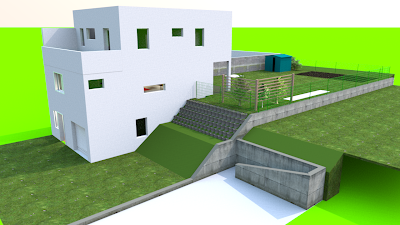
Let me give you some impressions of what I've achieved so far:

Not bad, eh?

Let's enter the house:


Yeah, I know, the lights are not perfect...

Here's my favourite: the bathroom


Much of what's shown on above pictures is done using the objects that come ready with Sweet Home 3D, or with simple boxes resized and colored. But there is also some self-made stuff, especially in the bathroom: bathtub, sink, fittings, ...

But how did I make them?

Well, this is where another free program comes into play: FreeCAD (http://sourceforge.net/apps/mediawiki/free-cad). I'm not a design engineer by profession, so learning this program, which is a 3D design program, was quite painful. In fact, it was not only learning the program, but also designing in 3D ;-) It doesn't seem as though this opensource project is being heavily worked on, but at least there was a new release, 0.13, recently. As the version number suggests, the program is not yet in release state, but kind of a beta. The previous version, which I started with, was a bit unstable, which was annoying from time to time. I was looking around for alternatives, but found none which I would have wanted to afford. There are for sure still a lot of features, e.g. python scripting, which I haven't tried yet. So, there is potential for even better designs than the ones i've achieved so far.

Maybe you're inspired now to have a look at these programs and give them a try yourself. It's fun!

Now, what I'd like to do here, is to share with you these objects that I've created for my planning. That will be furniture, fittings, stuff for the garden, ... I'm planning to show you one object per post with a brief explanation what it's used for, what real-world object it is inspired by, and also offer you to download the wavefront file, so you can use it in planning software yourself (I'll probably ask for some kind of donation, without obligation, to give you a chance to support my work if you like it).

Also, I'll probably feel like sharing with you some of my experiences as a "non-professional designer" - we'll see if there's anything I find worth sharing.

Last, please keep in mind that everything I show here is self-taught and therefore may be far from perfect. I'm pretty sure that there are a lot of mistakes in my models, which a professional designer wouldn't make. At least, it works for me and may be of use for you in some way or the other.

Preview? Ok: